French Family Workshop

Helping you enjoy our creations in your home

Simple Montessori Mobile/Gym

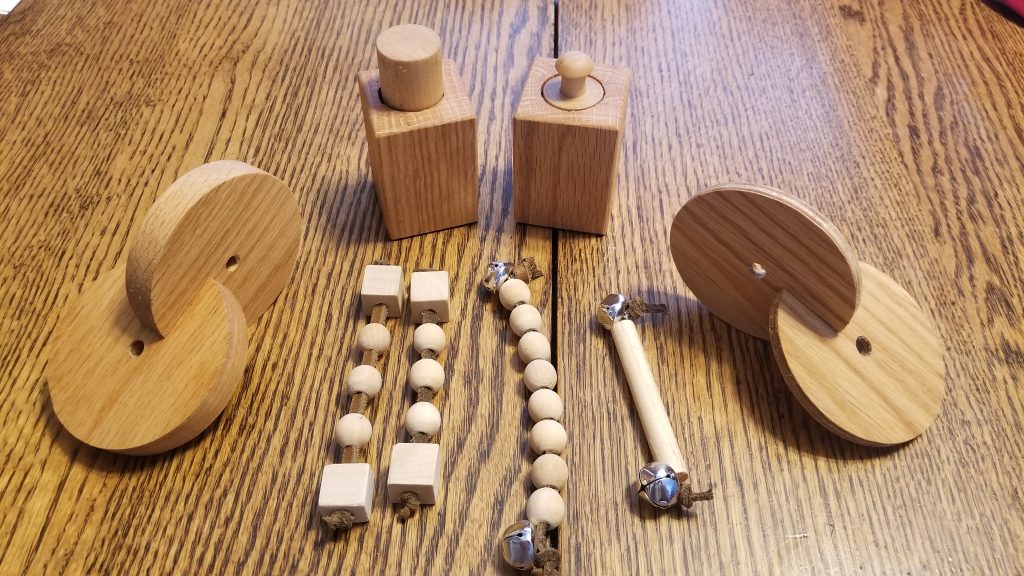
For our twins we wanted to build our own mobile so we could hang our Montessori mobiles. Being a fan of making a lot of our own toys, my wife made our own mobiles and I made the mobile/gym stand. Several people are requesting plans so I thought I would share them here as well.

Montessori DIY Mobile/Gym Stand

Materials

  • Lumber (Red Oak/Poplar/Birch)
    • Red Oak
    • Poplar Dowel 1″
  • 3/8″ Rope approx: 3-4 feet
  • Sand Paper
  • Glue
  • Finish
QuantityDimensionPurpose
42” Wide x ¾” Thickness by 32” LongLegs
11″ Dowel by 32″ LongAxle
Mobile Stand
3/4″ Thick Red Oak

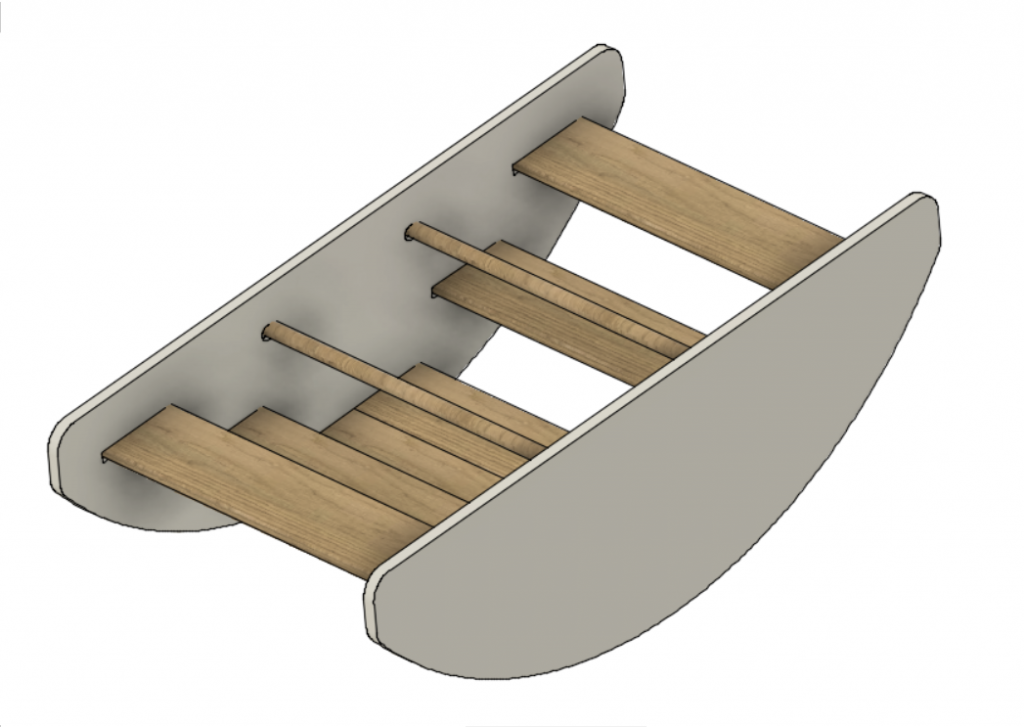
Building the mobile gym is very simple. You need four legs each out of 3/4″ lumber. I built mine out of red oak scrap I had leftover from our Montessori Spinning drums we build.

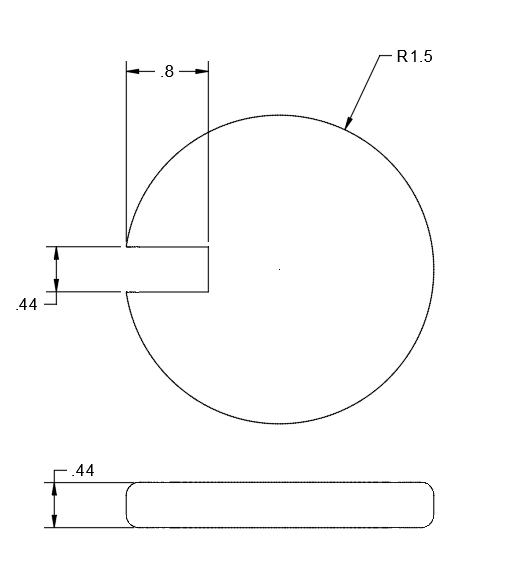
Each leg needs to be approximately 32″ in length and 2″ wide. Place a 1″ hole centered on one end of each leg exactly 1″ from the end of each board. This is important to make sure that the axles line up properly for a quality appearance.

Drill a smaller hole about 12″ from the top of each leg for adding a rope later in the process

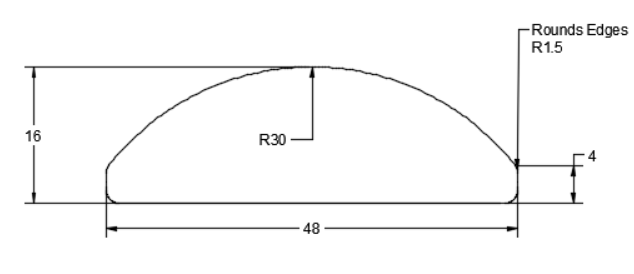
Add a nice curve to each end of the boards and apply a nice smooth round-over to each edge.

Doubles as a nice wardrobe when the twins were old enough

Next cut your 1″ dowel to 32″ and assemble the finished product. Add some type of stops at the ends of the dowel to prevent the legs from moving along the dowel. I used smaller 1/4″ dowels. Sand and apply the finish of your choice.

Finished View

The last step is to add a method to keep the legs from separating too far and to allow the gym to be adjusted to the right height for your needs.

We used rope through the lower holes made earlier to allow us to make the gym adjustable. Cut the rope and tie off knots when you find the right height and stability.

Your Mobile/Gym Stand is complete, enjoy!

Want to support us?

Our Own Shop

Our Etsy Shop

Tools Used

Some products displayed may earn us a commission. Learn More?

Montessori Pikler Triangle

Every child loves to climb. I wanted to ensure that our twins have a safe and dedicated area for them to explore their desire to climb. In hopes of helping them not feel compelled to climb on things they should not and endanger themselves. Enter the Pikler Triangle!

Let’s Build

Tools

Materials

  • Lumber (Red Oak/Poplar/Birch)
    • Red Oak
    • Poplar Dowels
  • Rope
  • Sand Paper
  • Glue
  • Finish
    • Beeswax & Olive Oil
    • Danish Oil
    • Polyurethane
QuantityDimensionPurpose
43” Wide x ¾” Thickness by 43” LongLegs
121″ Dowel by 48″ LongLadder Rungs
11″ Dowel by 52″ LongAxle

Build Legs

  1. Cut out 4 legs to dimensions.
  2. Use jigsaw or bandsaw to cut radius on all 8 ends to create a smooth end on each leg
  3. Mark out each hole for each rung and verify proper location so that each hole matches its mirror leg piece
  4. Drill the axle/top run hole completely through using the 1” Forstner Bit.
    • Note: These are the only 4 holes that go through the wood completely.
  5. Use the 1” Forstner bit to drill all 24 holes ½” deep for each ladder rung.
    • Note: Make sure not to go too far as your bit may drill too deep.
  6. Sand and make sure to round over any sharp edges.
  7. Finish as desired
    • Note: Make sure not to apply finish to the inside of each hole. The finish can weaken the glue bond when you install the rungs.

Cut and Assemble Rungs

  1. Cut all ladder rungs and the axle/top rung to length.
    • Tip: Round over each end of each rung to make it easier to align and insert into the corresponding hole on each leg during assembly.
  2. Apply glue to six ends of the ladder rungs.
    • Note: Do not apply glue to the top axle/rung
  3. Apply glue to the corresponding 6 holes on a single leg.
  4. Insert the glued ends of 6 rungs into the first leg.
  5. Apply glue to the opposite rung ends for the other half of the exposed rungs.
  6. Apply glue to a mirror leg piece for its corresponding 6 holes.
  7. Align and insert each rung into the correct corresponding leg holes.
    • Tip: Use clamps to assist you with aligning and inserting the rungs into the second leg.
  8. Clamp and clean up any glue that is pressed out.
  9. Repeat for second ladder.

Final Assembly

  1. Align the two ladders so that the axle/top rung holes align and insert the axle/top rung.
  2. Drill a ¼” hole on each end and insert & glue ¼” dowel plug to ensure that the two ladders stay on the axle.
  3. Drill a ½” hole centered between the 4th and 5th ladder run on each leg. This will be where we insert the rope
  4. Cut the rope in half to about 30” and insert through each hole
  5. Adjust the triangle to the desired angle. Ensuring that the triangle is shallow enough to ensure the triangle is stable enough for children to climb and is not too steep.
  6. Tie a stop knot on each end of the rope tight enough so the knots cannot come untied. This can be adjusted later to adjust the desired angle of the triangle.
  7. Your triangle is complete.

Want to support us?

We offer detailed plans in our store today, plans also include instructions on how to build a ramp and climbing wall.

Detailed Plans are also available

Our Own Shop

Our Etsy Shop

Digital Plans
Some products displayed may earn us a commission. Learn More?

Simple DIY Montessori Toys

Before our twins were born I realized that many of the smaller simple toys our newborns would use were quite simple to make with even the simplest of tools. Below are three such toys that can be made with a few scrap materials lying around the hobby room.

Montessori Interlocking Discs

7/16″ Thick x 3″ Diameter

Building the interlocking discs is very straight forward and simple. Selecting the thickness and diameter are the only limiting factors. I built mine using some 7/16″ oak scrap I had around from previous projects. I used a 3″ hole saw drill bit and cut 2 circles out. Once I have these cut I mark and measure out a gap that is exactly the thickness of my board 7/16″ and cut it out using a band saw.

Next I like to put a nice rounded edge on each circle using my 1/8″ round-over bit and sand and finish using my homemade beeswax and oil finish.

Want to support us?

Our Own Shop

Our Etsy Shop

Extra: If you have a CNC machine you can use my PDF file to cut your own quickly.

Montessori Grasp Cylinder and Pincer Cylinder

Palmer Dimensions

The palmer grasp block is designed for children as early as 8 months. They aid children in developing their whole hand grasp. This builds focus and fine motor skills. The pincer block takes the same concept even further by encouraging children to focus using their thumb and index finger

These are made quite simply by gluing 2 standard 1″ boards of wood together to form the overall thickness desired of 1.5″. Once this is dried I rip the board to 1.5″ wide and about 4″ long. I then cut this in half to form two rectangular cubes that are both about 2″ long.

I then mark the enter of each block and drill out a 1″ hole using a Forstner about 1.5″ deep. I cut 2 dowels about 3″ long. This is a possible chocking hazard here so it is important that the length is long enough to not be a hazard. I recommend using this chocking hazard tool for determining if any product has chocking hazards.

The palmer block is now ready for sanding and finishing, but the pincer needs to be shaped. I simply use my lathe to turn down and create a nice little handle on one end of the second dowel

Next I like to put a nice rounded edge on each block using my 1/8″ round-over bit and sand and finish using my homemade beeswax and oil finish.

Want to support us?

Our Own Shop

Our Etsy Shop

Montessori Rattles

The rattles are also straight forward. These are designed for when the child is not mouthing anything quite yet. The rattles allow the child to experience natural shapes and textures while also introducing the cause and effect of shaking the rattle with the bells. They require supervision and should not be used once the child starts to bring things to their mouths as these rattles do contain choking hazards if they come loose.

There are 2 basic types I made as show above. One is simply a dowel with 2 bells attached with eyelets on each end. The second type is a leather string that we slipped on wooden beads from the local hobby shop for texture and shape. Different variations you can add bells as well.

Tools Used

Some products displayed may earn us a commission. Learn More?

Montessori Rocking Boat and Steps

This fun rocking boat can be enjoyed for years and years. Turn the boat over and it becomes a bridge, a set of stairs, or a even a small table.

Let’s Build

Tools

Materials

  • 4’ x 32” of ¾” Baltic Birch Plywood
  • 12’ of 1” x 6” Lumber (Actual ¾” x 5 ½”)  
  • 4’ of 1” Poplar Dowel
  • Sand Paper
  • Wood Glue
  • #8 1 ½” Wood Screws
  • (Optional) Finish
  • (Optional) Paint
  • (Optional) Brushes

Cut List

QuantityDimensionPurpose
248 L x 16″ W x 3/4″ Thickness PlywoodRockers
624″ L x 1” x 6” Thickness LumberSteps
224″ L x 1″ Diameter DowelHandles

Step 1 Build the Rockers

  1. Mark out rough dimensions of plywood 48×16
    • Mark out the center line at 24”
  2. Use either a baton or other method to create the curve for each rocker edge
    • I used a thin baton and anchored the baton at the center top edge and the two 4” marks.  This creates a nice smooth curve for the rocking edge
  3. Mark the 1.5” radius on all four corners to create a smooth edge.
  4. Cut out using the jigsaw or bandsaw the final shape for each rocker

Cut Slots for Steps/Handles

  • Mark all the appropriate locations for the steps and handles

IMPORTANT: Make sure to mark the appropriate sides of the rocker panels.  Each is a mirror of the other.

  1. Use a 1” Forstner bit and drill a 3/8” deep slot for each of the 4 slots for the handles
  2. Use a router and straight edge bit to create appropriate 3/8” deep slots for each step.
    • Tip: Clamp a straight edge to be used to guide your router for each slot.
    • If you do not have a router you can use a chisel to clear out each slot.

Dry Assembly

Once the rockers, steps and handles are all cut out and slots made I recommend dry fitting everything together.  Clamp everything together, countersink and predrill several holes for each step and handle through the rockers.  This will be where our screws will go for final assembly. 

  • Optional: You can also countersink the screws in deeper to allow for a wood plug to be added later but be careful not to countersink too deep as this can weaken the bond to the steps

Sand all pieces and prepare for finish if desired.

Final Assembly

  1. Apply glue to all slots
  2. Reassemble the steps and handles
    • Tip: I used the screws to help clamp the rocker together.
  3. Clamp as needed and wait until glue is dry

(Optional) Paint and Finish Work

  1. Ensure everything is sanded appropriated and add any edge banding to the plywood edges if desired.
  2. Prep, prime and paint.
    • I enjoy the natural appearance of the wood steps and handles and used a natural beeswax finish to seal the wood.

Enjoy!

Detailed Plans are also available

Our Own Shop

Our Etsy Shop

Some products displayed may earn us a commission. Learn More?

Beeswax Finish

Beeswax Finish

Most wood projects need some type of finish to preserve and protect the finished project. Given a lot of my recent projects involve my young twins I needed to come up with a cheap solution to make a strong finish that is both durable and safe for my children.

Coincidentally I also like to make my own mead (honey-wine) for gifts and the occasional indulgence. So I also have an excellent source of Beeswax locally sourced.

Recipe

  • 1 part beeswax
  • 1 part oil
    • grapeseed, olive, food grade mineral oil are all good examples

I like to mix the solid beeswax in a mason jar with the oil and place it in the microwave. I then heat the mixture for 1-2 minutes or until all of the solids are dissolved.

Be careful here as this combination is very hot and will stick to your skin if spilled.

I then pour this mixture into a tin or jar and allow the mixture to cool.

With just a few minutes of work you can have your own food safe wood finish. Simply use a clean rag to apply the finish and wipe off any excess. Buff for a shiny finish with a clean rag.

Note: I sometime adjust the mixture by adding more or less oil to allow for a softer or harder finished product.

Want to get started quickly

Some products displayed may earn us a commission. Learn More?