
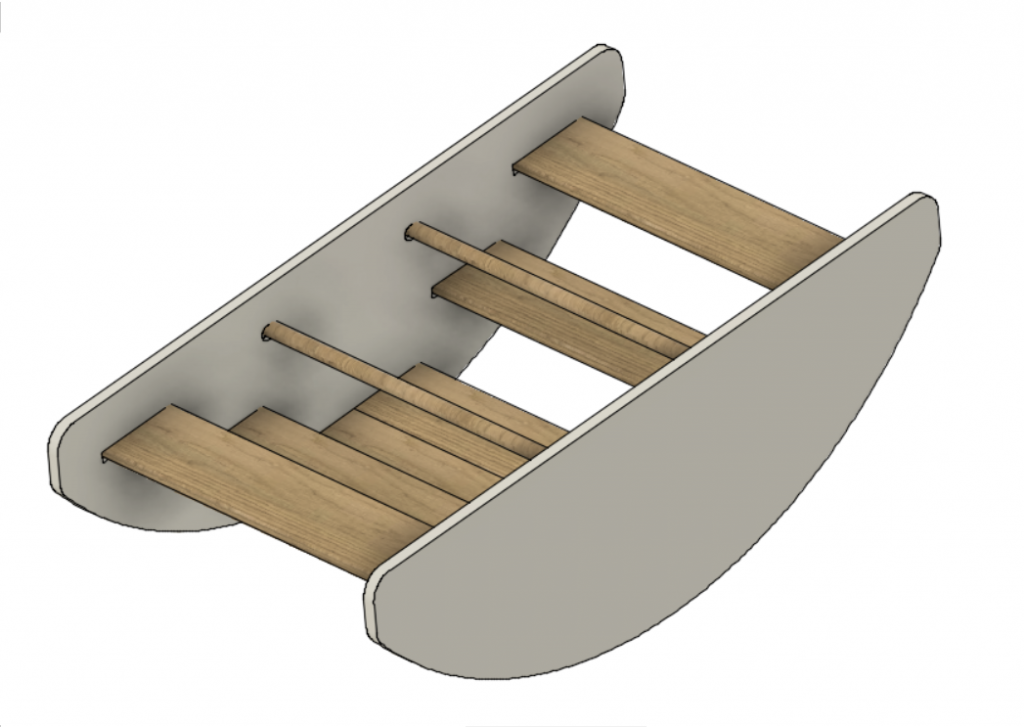
This fun rocking boat can be enjoyed for years and years. Turn the boat over and it becomes a bridge, a set of stairs, or a even a small table.
Let’s Build
Tools
- Saw
- Jigsaw
- Drill
- Router or Chisels
- 1/4” straight router bit if using router
- Sander or sanding block
- (Optional) Painting/Finishing tools
Materials
- 4’ x 32” of ¾” Baltic Birch Plywood
- 12’ of 1” x 6” Lumber (Actual ¾” x 5 ½”)
- 4’ of 1” Poplar Dowel
- Sand Paper
- Wood Glue
- #8 1 ½” Wood Screws
- (Optional) Finish
- (Optional) Paint
- (Optional) Brushes
Cut List
| Quantity | Dimension | Purpose |
| 2 | 48 L x 16″ W x 3/4″ Thickness Plywood | Rockers |
| 6 | 24″ L x 1” x 6” Thickness Lumber | Steps |
| 2 | 24″ L x 1″ Diameter Dowel | Handles |
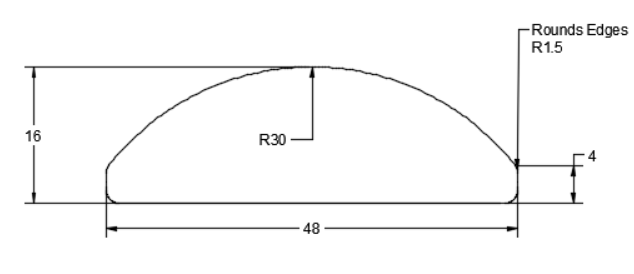
Step 1 Build the Rockers
- Mark out rough dimensions of plywood 48×16
- Mark out the center line at 24”
- Use either a baton or other method to create the curve for each rocker edge
- I used a thin baton and anchored the baton at the center top edge and the two 4” marks. This creates a nice smooth curve for the rocking edge
- Mark the 1.5” radius on all four corners to create a smooth edge.
- Cut out using the jigsaw or bandsaw the final shape for each rocker
Cut Slots for Steps/Handles
- Mark all the appropriate locations for the steps and handles
IMPORTANT: Make sure to mark the appropriate sides of the rocker panels. Each is a mirror of the other.
- Use a 1” Forstner bit and drill a 3/8” deep slot for each of the 4 slots for the handles
- Use a router and straight edge bit to create appropriate 3/8” deep slots for each step.
- Tip: Clamp a straight edge to be used to guide your router for each slot.
- If you do not have a router you can use a chisel to clear out each slot.

Dry Assembly
Once the rockers, steps and handles are all cut out and slots made I recommend dry fitting everything together. Clamp everything together, countersink and predrill several holes for each step and handle through the rockers. This will be where our screws will go for final assembly.
- Optional: You can also countersink the screws in deeper to allow for a wood plug to be added later but be careful not to countersink too deep as this can weaken the bond to the steps
Sand all pieces and prepare for finish if desired.
Final Assembly
- Apply glue to all slots
- Reassemble the steps and handles
- Tip: I used the screws to help clamp the rocker together.
- Clamp as needed and wait until glue is dry
(Optional) Paint and Finish Work
- Ensure everything is sanded appropriated and add any edge banding to the plywood edges if desired.
- Prep, prime and paint.
- I enjoy the natural appearance of the wood steps and handles and used a natural beeswax finish to seal the wood.
Enjoy!
Detailed Plans are also available
Our Own Shop
Our Etsy Shop
Some products displayed may earn us a commission. Learn More?
Recent Comments