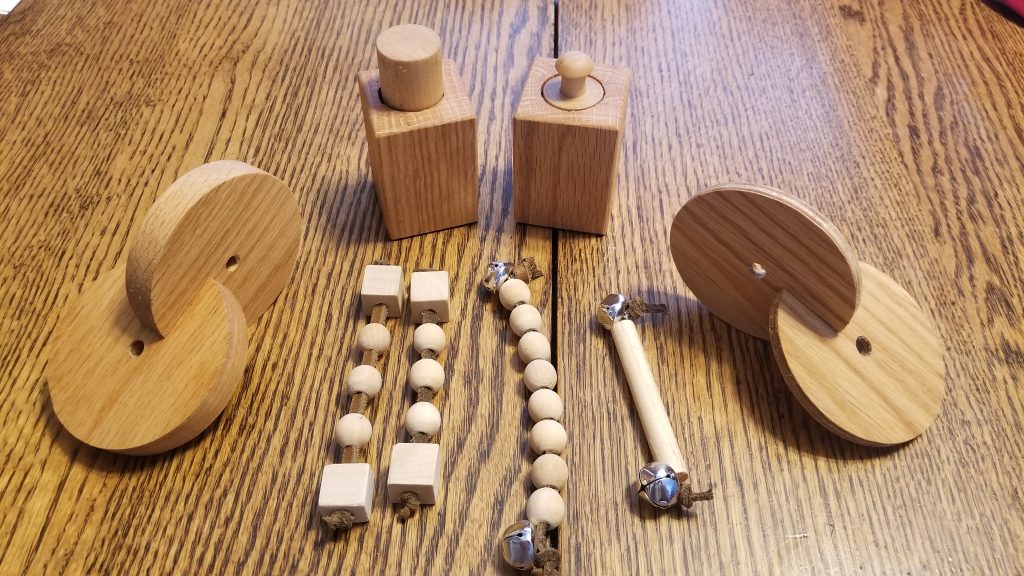
Before our twins were born I realized that many of the smaller simple toys our newborns would use were quite simple to make with even the simplest of tools. Below are three such toys that can be made with a few scrap materials lying around the hobby room.
Montessori Interlocking Discs
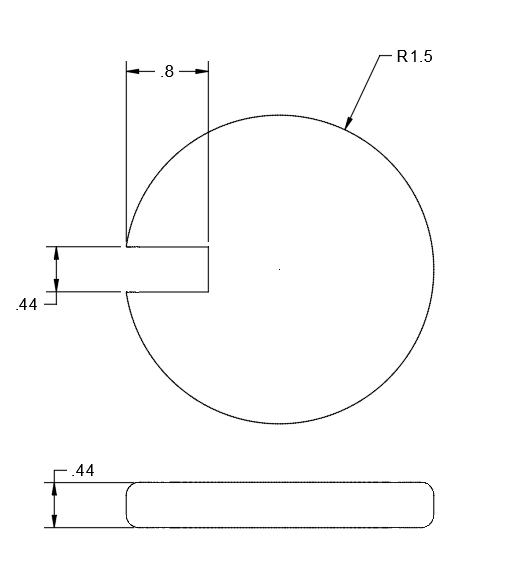
Building the interlocking discs is very straight forward and simple. Selecting the thickness and diameter are the only limiting factors. I built mine using some 7/16″ oak scrap I had around from previous projects. I used a 3″ hole saw drill bit and cut 2 circles out. Once I have these cut I mark and measure out a gap that is exactly the thickness of my board 7/16″ and cut it out using a band saw.
Next I like to put a nice rounded edge on each circle using my 1/8″ round-over bit and sand and finish using my homemade beeswax and oil finish.

Want to support us?
Our Own Shop
Our Etsy Shop
Extra: If you have a CNC machine you can use my PDF file to cut your own quickly.
Montessori Grasp Cylinder and Pincer Cylinder

The palmer grasp block is designed for children as early as 8 months. They aid children in developing their whole hand grasp. This builds focus and fine motor skills. The pincer block takes the same concept even further by encouraging children to focus using their thumb and index finger
These are made quite simply by gluing 2 standard 1″ boards of wood together to form the overall thickness desired of 1.5″. Once this is dried I rip the board to 1.5″ wide and about 4″ long. I then cut this in half to form two rectangular cubes that are both about 2″ long.
I then mark the enter of each block and drill out a 1″ hole using a Forstner about 1.5″ deep. I cut 2 dowels about 3″ long. This is a possible chocking hazard here so it is important that the length is long enough to not be a hazard. I recommend using this chocking hazard tool for determining if any product has chocking hazards.
The palmer block is now ready for sanding and finishing, but the pincer needs to be shaped. I simply use my lathe to turn down and create a nice little handle on one end of the second dowel
Next I like to put a nice rounded edge on each block using my 1/8″ round-over bit and sand and finish using my homemade beeswax and oil finish.

Want to support us?
Our Own Shop
Our Etsy Shop
Montessori Rattles
The rattles are also straight forward. These are designed for when the child is not mouthing anything quite yet. The rattles allow the child to experience natural shapes and textures while also introducing the cause and effect of shaking the rattle with the bells. They require supervision and should not be used once the child starts to bring things to their mouths as these rattles do contain choking hazards if they come loose.
There are 2 basic types I made as show above. One is simply a dowel with 2 bells attached with eyelets on each end. The second type is a leather string that we slipped on wooden beads from the local hobby shop for texture and shape. Different variations you can add bells as well.
Tools Used
Some products displayed may earn us a commission. Learn More?
Recent Comments